
Simple coin checking helps to quickly move away from fakes, fixed coins, or coins having hidden defects, saving much time.
Sending every coin to a paid expert is too costly and takes too long, needing a faster way.
Using simple tools, such as a free coin identifier, a UV lamp, and a scale, one can do a first look, finding 90% of the facts needed for a full check.
The main goal of checking stands as being sure the coin is real, its state not being made better by hand, keeping its true worth.

UV Light Check
A UV lamp stands as one of the most useful and simple tools, helping to find signs of repair unseen in normal light. UV rays make some materials shine, showing what was done to the coin.
UV light shows well that the coin was cleaned with strong chemicals, leaving clear signs.
- Strong cleaning. This means removing old surface color or dirt using strong acids, taking away the natural look.
- Acid signs. Acid parts remaining on the coin’s surface shine yellow or green under UV light, showing the past process.
- Surface color. Natural surface color does not usually shine under UV, acting as a real part of the coin.
- Glue signs. If the coin was glued or a piece of metal was put into it, the glue will shine blue or white, making the repair clear.
- Coin field. UV helps to see if the coin’s flat area was polished (cleaned off) or if a fake surface color was put on it, showing hidden work done to the coin.
Fake surface color is a special layer put on the coin, making it look older or hiding defects, changing its real state.
- Natural surface color. This forms over many years, being part of the coin, not shining.
- Fake surface color. This is often made using sulfur or other chemicals, which can give a dull, unnatural shine.
- Color change. Under UV light, the fake surface color can look like spots, clearly different from the rest of the surface, showing the repair.
- Difference. UV light helps to see that the surface color was put on unevenly, for example, only on one small area, making the repair easy to spot.
Working with the lamp must be done in a dark room, making the shine clear.
The coin must be clean, removing dust or dirt that could shine.
You must not look at the UV lamp light straight, protecting your eyes from damage, and ensuring safety.
Lamps with a light wavelength of about 365 nm must be used, being safe for the coin.
Checking with a Scale and Ruler
The weight and size of the coin stand as its main measures, showing its true nature, setting the correct details. Fakes often do not match the real coin in weight or width, making them easy to find.
The scale used must be correct, showing weight down to 0.01 gram, giving the needed accuracy.
- Standard weight. The exact weight of the real coin must be found in a book or list, setting the measure.
- Comparing. The coin must be weighed, comparing the number found with the standard weight, noting the difference.
- Normal difference. A difference of 0.1 to 0.2 grams is normal for old coins, caused by wear.
- Reason to doubt. If the coin weighs 0.5 gram less or more than the standard, this is a strong sign to think it is a fake, requiring more checking.
- Metal change. Fakes are often made from another, cheaper metal, that metal having a different density and, therefore, a different weight.
The coin must be measured using a caliper or a special coin measuring tool, getting its width and thickness.
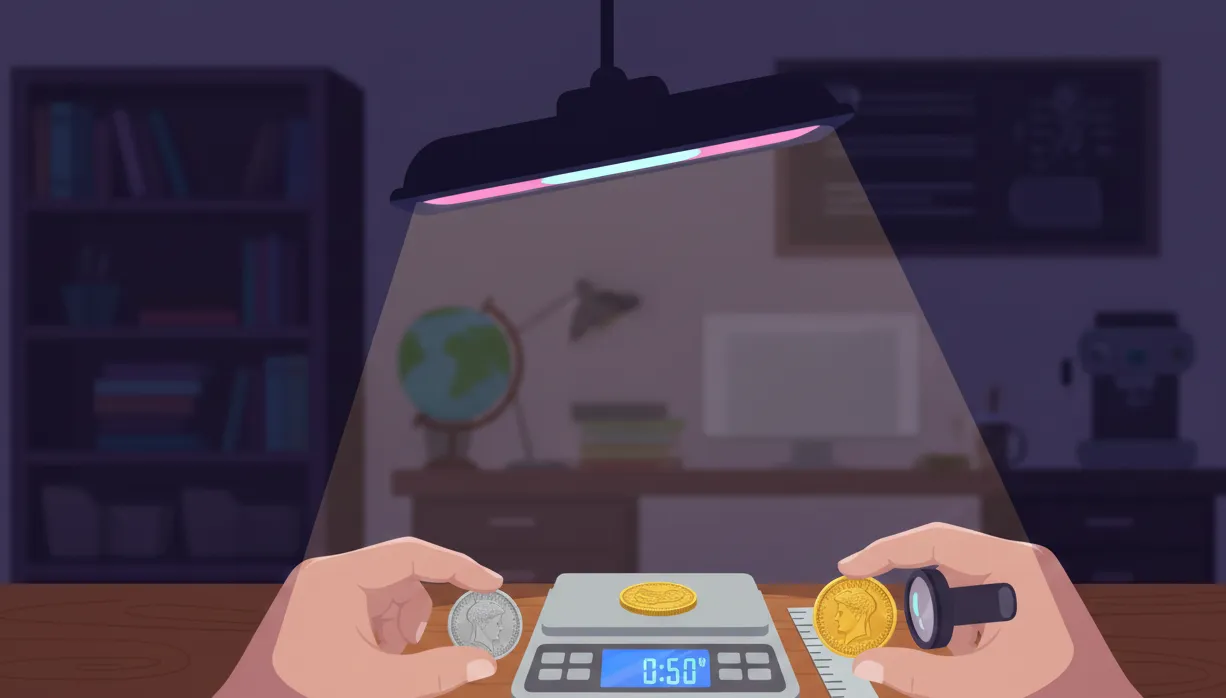
Magnifying Glass and Microscope
A magnifying glass stands as the simplest and most needed tool, allowing you to see details that the human eye cannot see.
The magnifying glass must have a zoom from 10x to 20x, making small things appear bigger.
- Casting signs. These are small air bubbles on the coin’s surface, remaining after the liquid metal was poured into the mold, showing a fake.
- Stamping signs. Real coins always have clear, sharp borders on the picture, proving the making method. On fakes, these borders can be soft or blurry, losing detail.
- Repair. With the magnifying glass, it is easy to see if cuts were made on the coin to hide scratches, or if small parts were soldered on, fixing old damage.
- Hairline marks. These are thin, side-by-side scratches, appearing when the coin was cleaned, greatly reducing the price.
- Edge. Looking at the edge of the coin with the magnifying glass helps to find signs of filing or re-cutting, which those actions are being done to change the edge design.
A digital microscope, which can be connected to a computer, gives a very big zoom, showing surfaces up close.
- Zoom. A zoom of up to 100x or more can be achieved, making small details visible.
- Photo/Video. Pictures or videos of defects can be taken, allowing you to send them to other experts.
- Metal structure. The microscope lets you see the structure of the metal and the surface color, that structure being different in real coins and fakes.
- Comparing. Small details (for example, letters in the writing) can be compared with a perfect picture, checking the shape.
Sound and Magnet Check
The sound and magnet tests stand as fast and simple ways of checking the coin, giving a quick idea of the metal, besides the opportunity to check it via a coin identifier app.
The coin must be hung on a thread, lightly hitting it with a thin object, such as a pencil.
- Real sound. A real coin made from precious metal (silver, gold) makes a clear, long, ringing sound, proving its good quality.
- Fake sound. A fake or a coin made from mixed metal makes a dull, short sound, showing bad metal.
- Crack. If the coin has a crack, the sound will be dull and shaky, meaning damage.
This check is simple, but it does not always give a full answer, being only a first step.
- Precious metals. Gold and silver do not stick to a magnet.
- Non-magnetic fakes. A fake can be made from non-magnetic metals (for example, copper, bronze), meaning no reaction to the magnet does not promise realness.
- Magnetic parts. If the coin sticks to the magnet (when it should not), this shows the presence of iron or nickel parts, which almost always means the coin is a fake.
Conclusion
Using simple tools like a coin app for Android for checking coins stands as a must-have skill for every collector, keeping the collection safe.
The UV lamp allows you to find cleaning signs and fake surface color, those signs being unseen by the eye.
Accurate scales and a caliper help you move away from rough fakes, which do not match the standard weight and size.
A magnifying glass, being the most useful tool, allows you to see casting and repair signs.
Checking must be done in several steps, using different tools, because one tool may not show a defect that another tool will find.
This simple rule helps you stop buying fakes and keep the worth of your collection, guarding your money.